Quantcast
Channel: Archlinux User
Viewing all 95 articles
Browse latest View live

How to Install & Configure SLIM login manager on Archlinux

$
0
0

If you want to install alternative login manager that light weight and simple, you can try SLiM. SLiM is a Simple Login Manager. SLiM is simple, lightweight and easily configurable. 
SLiM does not require the dependencies of GNOME or KDE and can help make a lighter system for users that like to use lightweight desktops like Xfce, Openbox, and Fluxbox. 

SLiM is a Desktop-independent graphical login manager for X11, derived from Login.app .

It aims to be light and simple, although completely configurable through themes and an option file; is suitable for machines on which remote login functionalities are not needed. Features included:
  • PNG and XFT support for alpha transparency and antialiased fonts
  • External themes support
  • Configurable runtime options: X server, login / shutdown / reboot commands
  • Single (GDM-like) or double (XDM-like) input control
  • Can load predefined user at startup
  • Configurable welcome / shutdown messages
  • Random theme selection
Official Sites: http://slim.berlios.de/

Installation on Archlinux.
$sudo pacman -S slim slim-themes archlinux-themes-slim

After you install slim, now configure your .xinitrc
$nano ~/.xinitrc
For this example, lxde as defaults desktop environment.
DEFAULT_SESSION=startlxde

case $1 in
lxde)
              exec startlxde
              ;;
kde4)  
              exec startkde
              ;;
anotherdesktop)
              exec startanotherdesktop
*)
              exec $DEFAULT_SESSION
              ;;
esac
Anotherdesktop you can change to another desktop environment. Set xinitrc to executable.
$chmod +x ~/.xinitrc
Enable slim
$sudo systemctl enable slim
If you have another login manager, disable it first.

Configuring SLIM, all configuration is on /etc/slim.conf
$sudo nano /etc/slim.conf

1. Auto Login.
Find this line
# default_user simone
And
# auto_login no

Uncomment all of them (remove #), change simone to your username, change "auto_login no" to "auto_login yes"

This will automaticly login with default desktop.

2. Change Default Desktop.
See the .xinitrc configuration above.
change the DEFAULT_SESSION=your choosen desktop session
Here for the list:
awesome
dwm
startfluxbox
fvwm2
gnome-session
openbox-session
startkde
startlxde
startxfce4
enlightenment_start
for the example, openbox-session
DEFAULT_SESSION=openbox-session

3. Choose DesktopEnvironment at login
Open /etc/slim.conf, find this line.
sessions            icewm-session,wmaker,blackbox
Add desktop that you have installed, make sure you have added the exec on .xinitrc, then on login press F1, to switch another desktop environment.

For this example.
See on .xinitrc, that bolded text below.
lxde)
              exec startlxde
              ;;
kde4) 
              exec startkde

the bolded text, is lxde and kde4 so to add lxde & kde4 on sessions.
sessions              lxde, kde4, icewm-session,wmaker,blackbox
Save, then reboot to try.

4. Change themes on Archlinux.
The themes is located on
/usr/share/slim/themes
$cd /usr/share/slim/themes
$ls
You will see listed themes,
For this example the themes that i want to add is archlinux.
So to add archlinux.
$sudo nano /etc/slim.conf
Find this line.
current_theme       default
Change default to archlinux
current_theme       archlinux
Then save, Reboot to see the changes.

To preview themes.
$slim -p /usr/share/slim/themes/themename
Here's some themes of slim on archlinux:

Default
Archlinux
Archlinux Darch Grey
Archlinux Retro
Capernoited
For another themes, see by yourself.
Enjoy.

How to Install & Configure ICEWM window manager on Archlinux

$
0
0
Based on Wikipedia, IceWM is a window manager for the X Window System graphical infrastructure, written by Marko Maček. It was coded from scratch in C++ and is released under the terms of the GNU Lesser General Public License.
It is relatively lightweight in terms of memory and CPU usage, and comes with themes that allow it to imitate the UI of Windows 95, OS/2, Motif, and other graphical user interfaces". 
Installation on Archlinux.
$sudo pacman -S icewm icewm-utils mmaker icewm-themes pcmanfm idesk

icewm = main package of icewm
icewm-utils = tools to configure icewm.
mmaker = for create app menu in start menu
icewm-themes = archlinux icewm themes.
pcmanfm = icewm doesn't have file manager, so you can try pcmanfm.
network manager = see here.
idesk = to put icon on desktop

From AUR: (you must install yaourt first or install pacman XG4)
$sudo yaourt -S usbmount
This for auto mount your usb flash drive.

If you have installed the LXDE desktop. Then you just install icewm, mmaker, & icewm-themes.

Okay after you install icewm then login to desktop.

To Login using LXDM, GDM, KDM, lightdm-> icewm is automaticly detected, just choose the session icewm then login.

For Slim, see the configuration here.

Okay login to ICEWM. Here's some the icewm desktop themes.

Okay here's the step to make ICEWM more comfortable.
1. Copy configuration folder to user folder.
Do it by normal user.
$ mkdir ~/.icewm/
$ cp -R /usr/share/icewm/* ~/.icewm/
2. Add app menu, on startmenu
you can use mmaker.
$sudo mmaker -f icewm
Logout or changing the theme to make effects. Now see on the start menu, the results is like this.

3. Automount USB/Internal drive
Well it's not desktop environment, so it's different, to be able auto mount internaldrive, just add the partition into /etc/fstab/ see post here.

To automount USB drive, see above, install usbmount from AUR.


4. Add icewm control center on menu.
Run icecc on terminal, then choosemenu editor.


Open system or place that you want, then click add, insert your title, icons. For exec is "icecc", see below.

5. Customize Icons on Start Menu Application
It same as Point #4 above, choose on menu editor.

Click on the app menu picture, then do like this gif animation to change the icons.

But To change apps icon only can be change one by one.. :lol: enjoy.

6. Add Icons on File Manager (pcmanfm).
You can install some icons, for example oxygen-icons
$sudo pacman -S oxygen-icons
Then
$sudo nano /etc/gtk-2.0/gtkrc
Then change into like this for oxygen icons
gtk-icon-theme-name = "oxygen"

7. Create Autostart Apps
To create startup application.
$nano ~/.icewm/startup

Then insert the apps that you want to start automaticly.
#!/bin/sh 
idesk& 
nm-applet&
volumeicon&

Then save.
Make it executable
$chmod +x ~/.icewm/startup

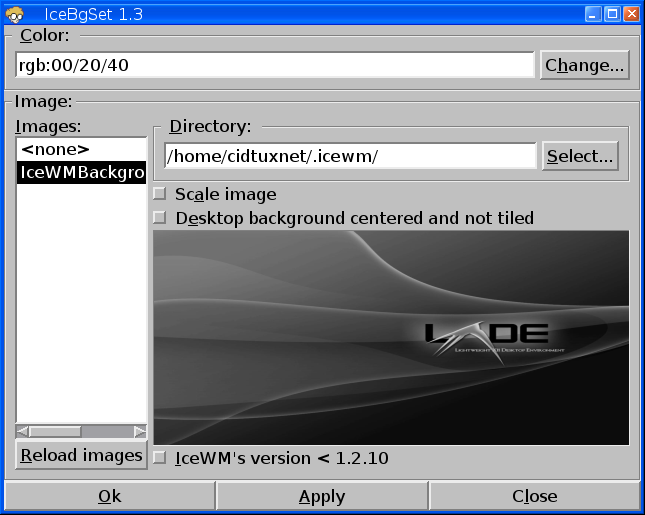
8. Change Background
open icecc, then click on, background option editor.


Then set your directory of your wallpaper, then choose the wallpaper.


Then to strectch wallpaper, enable scale image, then apply.

9. Create icon menu on Desktop
By default icewm doesn't have tools to create icons menu on desktop, but you can use idesk to do it.
Create startup like point #7. command line is idesk
then create .idesktop folder
$mkdir ~/.idesktop
Logout and login to see the efects, and it should like this.

To add more icon, open .idesktop directory, then create file with this format.

For this example, i create LXterminal icons.

And save as yourfile.lnk files. For that example is lxterminal.lnk, then logout and login. Here's the result.

10. Add Networkmanager & volumecontrol on system tray.
You can use volumeicon to control volume on system tray
Install it
$sudo pacman -S volumeicon

Make sure you have installed the alsa driver.
Then add the commands on point #7 above.

For network manager, add nm-applet command to point #7 too.

Here the result.
For mixer. It will show up the alsa mixer.

11. Modify Quick Apps on Icewm Panel.
open icecc, then choose, toolbar editor. Then add the apps that you want.

12. Change Font Style.
For easy editing, i suggest you install leafpad
$sudo pacman -S leafpad
Then.
$leafpad ~/.icewm/preferences
Search for fonts. Then change to your needs. And don't forget to uncomment them.
I don't change the fonts, because the default is better. :)

13. Move Icewm panel to top
$leafpad ~/.icewm/preferences then find this line. Uncomment the set to 1.

And here for the results.
14. Changing the themes.
Open start menu, then choose settings and then themes, there a lot themes that you can choose.

15. Make ICEWM transparent
To make conky, screenlets have transparent on widget you can try xcompmgr
$sudo pacman -S xcompmgr
Here's my snapshot with conky:


That's it. Enjoy Icewm on Archlinux. :D

How to install HP Deskjet 1000 on Archlinux

$
0
0
Last week i buy a new printer, it's HP Deskjet 1000. On the box only included with windows driver on CD. On windows 7 the printer looks fine. Now i want this printer work to on Archlinux. Here's some my step to make this printer work on Archlinux.


1. Installing CUPS & HPLIP
$sudo pacman -S cups hplip

2. Enable CUPS
$sudo systemctl enable cups

3. Download PPD File for HP Deskjet 1000
Download PPD File from here:1000c

Or From my google drive.

4. Add user to lp group
$sudo gpasswd -a username lp

5. Setup HP Deskjet 1000
open terminal then.
$sudo hp-setup -i
Press Enter or insert "0"

it will be error PPD file, click yes to choose the path
type the /path/to/file.ppd then just hit enter, if you get cups error, restart cups.
$sudo systemctl restart cups
$sudo hp-setup -i

Do same as above, until you get "adding print queue....", it will look like this.

You will be testing a print. That's it now your printer is working now. and it's available on printing menu. For example, Libreoffice see below:

Here, some video perform printing on Archlinux.
Enjoy.

How to clone archlinux installation to another pc (another ways)

$
0
0
Hi, i have a archlinux installed on my primary PC, then i want to clone it on my netbook. I'm using "copy-paste" methods to copy all files to new hard disk. There are official way that you can follow on here. But on this post i'm using my own methods to clone the archlinux installation.

Here's my methods:
1. Copy Paste all filesystem to new disk.
2. Boot into live USB.
3. Get into chroot
4. link lib to usr/lib
5. Reinstall kernel & glibc
6. Change permission folder /home
6. Reboot
7. Reinstall all packages.

Needed tools:
1. Sata to USB converter
2. Archlinux Live USB

On this situation:
My Archlinux installation:
Intel Dual Core 3.Ghz, Nvidia 9300GS
Target:
Intel Atom N270, Intel GMA.

Ok let's clone (Use it at your own risk).
Make sure your archlinux installation is upgraded to latest (pacman -Syu)
1. Insert Drive(sata drive) on PC (that archlinux installed).

2. Cek using fdisk -l where your drive is located. 
On my machine
Archlinux installation is /dev/sdc1
Target clone is /dev/sde4

3. Copy All files
#mount /dev/sde4 /mnt
#cp -r /bin /mnt/bin
#cp -r /boot /mnt/boot
#cp -r /dev /mnt/dev
#cp -r /etc /mnt/etc
#cp -r /home /mnt/home
#cp -r /lib /mnt/lib
#mkdir /mnt/mnt
#cp -r /opt /mnt/opt
#mkdir /mnt/proc
#cp -r /root /mnt/root
#mkdir /mnt/run
#cp -r /sbin /mnt/sbin
#cp -r /tmp /mnt/tmp
#cp -r /sys /mnt/sys --> if error just Ctrl +c
#cp -r /usr /mnt/usr
#cp -r /var /mnt/var
Done, put the clone hardisk into the machines (my netbook)

4. Boot Archlinux Live USB on the new machines & Configuring
On the new machines, sde4 is change to sda4.
#mount /dev/sda4 /mnt
#genfstab -p /mnt >> /mnt/etc/fstab
#arch-chroot /mnt
sh-4.2#ln -s /lib /usr/lib
sh-4.2#pacman -S linux glibc sudo
sh-4.2#chmod -R 0777 /home/youruser
-------------------------------
on my situation i'm using nvidia, and the target is intel (if your machine is same then you can skip it)
sh-4.2#pacman -R nouveau-dri xf86-video-nouveau
Download manually the driver from archlinux repo (intel-dri, xf86-video-intel) then install it using pacman -U
Edit /etc/mkinitcpio.conf, then change modules. on my machines i change nouveau to i915
--------------------------------
sh-4.2#mkinitcpio -p linux

5.Set timezone
sh-4.2#rm /etc/localtime
sh-4.2#ln -s /usr/share/zoneinfo/Yourregion/yourcity /etc/localtime
sh-4.2#nano /etc/locale.gen
Uncomment this for default english
en_US.UTF-8 UTF-8
en_US ISO-8859-1
sh-4.2#locale-gen

6. Set Grub
sh-4.2#modprobe dm-mod
sh-4.2#grub-install --target=i386-pc --recheck --debug /dev/sda
sh-4.2#mkdir -p /boot/grub/locale
sh-4.2#cp /usr/share/locale/en\@quot/LC_MESSAGES/grub.mo /boot/grub/locale/en.mo
sh-4.2#grub-mkconfig -o /boot/grub/grub.cfg
sh-4.2#exit
#reboot

7. Reboot & Reinstall all packages.
Now you should boot into archlinux.(you will see error when booting it you can fix it later). Login into user, then connect the internet. 
#comm -23 <(pacman -Qeq|sort) <(pacman -Qmq|sort) | pacman -S -

Done
Now you can fix file configuration like /etc/fstab /etc/pacman.conf, etc.

8. Done. :D

This my PC with intel Dual core & Nvidia VGA Machines:


And here's the clone on my netbook.. :D :


Enjoy.

How to Install Kingsoft Office / WPS office on Archlinux with English Language

$
0
0
WPS office for Linux is free office suite, which includes free word processor, spreadsheet program and presentation maker. These three programs help you deal with office tasks with ease.

WPS office features:
Writer - Efficient word processor;
Presentation - Multimedia presentations creator;
Spreadsheets - Powerful tool for data processing and data analysis

Although it is a free suite, Kingsoft Office comes with many innovative features, including a paragraph adjustment tool, and multiple tabbed feature. It also has Office to PDF converter, automatic spell checking and word count features. In this latest version, new features such as watermark in document, and converting PowerPoint to Word documents are also supported.

Sites:
http://linux.wps.cn/

On ArchLinux WPS Office is  is available through AUR repository.

You can install it using PacmanXG4 or Build from AUR link.

After Install it, then running it. By default it's using chinese Language.


to make it English do this after installation. I found solution from here:
http://mosayanvala.wordpress.com/2013/03/04/wps-for-linux-first-impressions/

$cd /opt/kingsoft/wps-office/office6/2052
$sudo rm qt.qm wps.qm wpp.qm et.qm

Then Restart the wps-office. Now wps office will be using english language, although not all is converted to english, but looks better.

Here's the main apps of Kingsoft / WPS Office.

Presentation :


Spreadshet:


Writer :


okay, that's it, enjoy Kingsoft / WPS office beta on Archlinux. If you have android devices, there are Kingsoft office Apps too on Play Store.

:D

How to Install Naver LINE on Archlinux

$
0
0
LINE is application from Naver. LINE is free call/messenger application for mobile devices. It's available for Android, Iphone, Blackberry, and also windows Phone. Besides mobile devices, LINE also available for desktop. And at this time only for windows & mac operating system that LINE support it.

How about Linux. Well there's another way to run LINE on Archlinux. Install W.I.N.E then install it. :D

But I can't get it running well, when i want to login in. It crash. So i look into google, then found a solution from here.

http://appdb.winehq.org/objectManager.php?sClass=version&iId=25493&iTestingId=74843

I must install the vcrun2008 first. After that, LINE works perfects.

Okay here's the step.

1. Download LINE Naver (Windows version)
http://dl.desktop.line.naver.jp/naver/LINE/win/LineInst.exe

2. You must have a email & password that registered on your phone.

3. Install wine & winetricks.

$sudo pacman -S wine winetricks

4. Install vcrun2008

$winetricks vcrun2008

5. Install LINE installer (LineInst.exe).

6. Run Line, then login with your email & password.

7. Done & Enjoy.

Here's the snapshot.


Have fun. :)

How to Install & configuring Zekr on Archlinux

$
0
0
Zekr is Quran study tool for simply browsing and researching on the Holy Quran. It is a Quran-based project, planned to be a universal, open source, and cross-platform application to perform most of the usual refers to Quran. The main idea is to build an as generic as possible platform to accept different Islamic resources.


Official Zekr Sites:

Zekr is available through AUR repository:

You can also using Universal Linux version:

Installation from AUR:
$wget https://aur.archlinux.org/packages/ze/zekr/zekr.tar.gz
$tar -xvzf zekr.tar.gz
$cd zekr
$makepkg -s
$sudo pacman -U *pkg.tar.xz

It should available on Offices menu. Run from there, for universal version, extract the packages, find zekr.sh, then make executable, then run it.

Below is zekr application:


To install more translation visit this link:
http://zekr.org/resources.html#translation

And for recitation visit this link:
http://zekr.org/resources.html#recitation

For installation translation/recitation, open Tools -> Add, then choose translation/recitation that you have downloaded.


To change Translation -> View -> Translation.
To change Recitation -> Audio -> Recitation.

To change main language of zekr, open tools, then options. Here's the options menu:


Ok, that's it, hopefully useful for Muslim, and anyone who is interested in the Qur'an.
^_^

How to Install Yaourt for Installing AUR packages on Archlinux

$
0
0
Archlinux have User Repository a.k.a AUR. To install from them, you can do it manually by download the PKGBUILD and makepkg to build the package and install it.


But it will take time when you install AUR packages that have dependency on aur too. To make it simple, you can use Yaourt. This software will install AUR packages and also take care dependencies too.

To install Yaourt:
Install Package Query First
$wget https://aur.archlinux.org/packages/pa/package-query/package-query.tar.gz
$tar -xvzf package-query.tar.gz
$cd package-query
$makepkg -s
$sudo pacman -U *.pkg.tar.xz

Then install yaourt packages:
$wget https://aur.archlinux.org/packages/ya/yaourt/yaourt.tar.gz
$tar -xvzf yaourt.tar.gz
$cd yaourt
$makepkg -s
$sudo pacman -U *.pkg.tar.xz

Done.

For Usage.

Installing packages
$yaourt -S aurpackagename

Upgrade Packages
$yaourt -U aurpackagename

Upgrade System & AUR
$yaourt -Syua
This will update system and also AUR packages

Remove packages
$yaourt -R aurpackagename

For more help
$yaourt -h

Ok that's it now you can install AUR Packages easily using yaourt command. If you want to try Pacman GUI you can install PacmanXG4.

Enjoy

How to install & Configuring Awesome window manager on Archlinux

$
0
0
Awesome is lightweight window manager and a highly configurable, next generation framework window manager for X. It is very fast, extensible and licensed under the GNU GPLv2 license.

It is primarly targeted at power users, developers and any people dealing with every day computing tasks and who want to have fine-grained control on theirs graphical environment.

Official Sites:
http://awesome.naquadah.org/

Installation:
$sudo pacman -S awesome

Also you need install these to run terminal.
$sudo pacman -S xterm

If you using login manager like lxdm, gdm, etc, awesome automaticlly listed on there. Just choose awesome on login manager. :)

Here's the default awesome interface:

To run apps, right click then open terminal, type the apps you like. 

To configuring aweseome, first create config folder for awesome
$mkdir -p ~/.config/awesome
$cp /etc/xdg/awesome/rc.lua ~/.config/awesome/

For more themes, see the list below:

For changing themes & configuration, see below for example, i change the themes to steamburn:
download all zip from here:
https://github.com/copycat-killer/awesome-copycats

Then extract it, copy all files into : ~/.config/awesome/

Then rename rc.lua.steamburn into rc.lua, remove old file if exists.

Then configure the rc.lua, and set the correct path.

Find the variable definitions, then set the correct path. Save, then reload the awesome. If you get error, try install the needed packages.

On steamburn theme, this theme need vicious packages. Install it first then restart  again. Fix the unused command on rc.lua, if you get red notification again.

Here's steamburn themes:


That's it, awesome is lightweight, but for normally desktop user it's not recommended for them. :D

Enjoy.

How to Install & Configuring Fluxbox Window Manager on Archlinux

$
0
0
Fluxbox is another window manager for X11. It is based on the Blackbox 0.61.1 code, but with significant enhancements and continued development. Fluxbox is light  and fast, yet provides interesting window management tools such as tabbing and grouping. 
Its configuration files are easy to understand and edit and there are hundreds of fluxbox "styles" to make your desktop look great. With FluxBox you can turn an old Pentium 800 box with just 256MB of RAM into a very usable computer.

Fluxbox

To install it:

$sudo pacman -S fluxbox

Then install another software that you needed, ex: terminal, browser, network manager, etc.

To run fluxbox easy way, you can try to install these login manager:
lxdm

$sudo pacman -S lxdm
$sudo systemctl enable lxdm
$sudo systemctl start lxdm

or using slim.

Generating Menu Application on Fluxbox
After you login to fluxbox, generate apps menu with this command, open terminal (xterm, lxterminal, etc).

then type

$fluxbox-generate_menu

Done now fluxbox have add app menu.


But not all application is listed on there, the best way you can using mmaker.

$sudo pacman -S mmaker
$mmaker -f FluxBox

Now all application should available on fluxbox menu.


Change Background / Wallpaper on FluxBOX

To change background you can use feh.
$sudo pacman -S feh
Then
$fbsetbg /path/to/your/imagefiles.jpeg


To make it automaticly set every start.
$chmod 770 ~/.fehbg

Then edit ~/.fluxbox/init
$nano ~/.fluxbox/init

Add at the end of line
session.screen0.rootCommand: ~/.fehbg
like this pic:

Save then logout and relogin to see the results.


Adding Network Setting & Volume Setting on System Tray:

Network Manager Applet:
Install network-manager-applet first
$sudo pacman -S network-manager-applet

Volume Settings:
You can use FBMIX from AUR
$wget https://aur.archlinux.org/packages/fb/fbmix/fbmix.tar.gz
$tar -xvzf fbmix.tar.gz
$cd fbmix
$makepkg -s
$sudo pacman -U *.pkg.tar.xz


to automaticly start at reboot. you can add them on ./fluxbox/startup like this picture:
Here's the result on systemtray:

Add more themes/styles on Fluxbox

Download fluxbox styles on AUR.:
https://aur.archlinux.org/packages.php?ID=28743

After you install it. Then create link to /usr/share/fluxbox/styles
$rm -r ~/.fluxbox/styles/
$ln -s /usr/share/fluxbox/styles/ /home/yourusername/.fluxbox/
Done now you can see more themes at styles menu.


Adding True Transparency on Fluxbox
Just install xcompmgr, then set on startup, you can use transparent widget like screenlets, or conky that support it.
$sudo pacman -S xcompmgr

Modify Hotkeys
Simply edit ~/.fluxbox/keys
$nano ~/.fluxbox/keys

Change FB Panel position
Click on Panel, then choose placement, then set your Panel position.


Ok that's it for fluxbox.
Enjoy. :D

How to install & configuring conky on Archlinux

$
0
0
Conky is a free system monitor software for the X. It is runs for GNU/Linux and FreeBSD. It is released under the terms of the GPL license. Conky is able to monitor many system variables including memory, CPU, disk space, swap, temperature, top, upload, download, system messages, and many more. 

It is extremely configurable, however, the configuration can be a little hard to understand. Conky is a fork of torsmo.

Official sites:
http://conky.sourceforge.net/

Installation on Archlinux:
$sudo pacman -S conky


When you start conky, you will see the default conky like this:


Configuration:
All conky configuration is set in conkyrc file. You can modify on it.
$cp /etc/conky/conky.conf ~/.conkyrc
or you can directly create .conkyrc file

For example if you want to apply this conkyrc:
http://conky.sourceforge.net/conkyrc-jc

Just save as .conkyrc directly to your home, then restart conky. Here for the result.


That's the basic configuration. For more config file/theme you can visit:
http://conky.sourceforge.net/screenshots.html
https://bbs.archlinux.org/viewtopic.php?id=39906

For extended version of conky you can install it from aur / pacmanxg4
conky-lua, conky-cli, conky-nvida, conky-lua-nv
you need install toluapp first from aur, before installing conky with lua.

Example for applying config with lua files:
http://bigrza.deviantart.com/art/Suuuuny-conky-153331007

Download zip files, extract it. then copy conkyrc & text.lua to home, then rename .conkyrc

Done, then change wallpaper that included with zip.


How to get transparent work on fluxbox, icewm, etc.
You need install xcompmgr to get transparent.
$sudo pacman -S xcompmgr
And set autostart on your desktop environment/wm

but for some config files, it's work perfectly without xcompmgr


Here's my result, the text is not place correctly, because my resolution is not same as the author. :3


For more lua themes see below:
http://desktopspotting.com/26/best-conky-configs-for-linux-desktop/

Ok that's it, enjoy conky. :D

Idesk - icon Manager for window manager (icewm, fluxbox, openbox, etc)

$
0
0
iDesk gives users of minimal wm's (icewm, openbox, fluxbox, etc..) icons on their desktop. The icon graphics are either from a svg or png (vector) file and support some eyecandy effects like transparency. Each icon can be confgured to run one or more shell commands and the actions which run those commands are completely configurable.
In a nutshell if you want icons on your desktop and you don't have or don't want gnome or KDE doing it, you can use idesk.
Official Sites:
http://idesk.sourceforge.net

Installation on Archlinux:
$sudo pacman -S idesk
$mkdir ~/.idesktop
$cp /usr/share/idesk/dot.ideskrc ~/.ideskrc

Then make this app autostart on WM to run it.

To Change Background Wallpaper on idesk:

$nano ~/.ideskrc
Find:
Background File & Background Source :
Change source to folder background, and file to background file directly.

Create Icons on desktop:


A simple and easy way.
$nano ~/.idesktop/yourfile.lnk
and add text like this: (capital letter sensitive)
table Icon
Caption: App Title
ToolTip.Caption: Teel about your apps
Icon: /usr/share/icons/hicolor/32x32/apps/yourapps.png
Width: 32
Height: 32
X: 977
Y: 369
Command[0]: appcommand
end

-----------------
Example:
table Icon
Caption: Chromium
ToolTip.Caption: Google's OSS Web Browser
Icon: /usr/share/icons/hicolor/32x32/apps/chromium.png
Width: 32
Height: 32
X: 977
Y: 369
Command[0]: chromium
end

And here's the result:


And how about X & Y, leave it same as above, you can move it by using your mouse... ^_^.

That's it about idesk
Enjoy.

How to Install XFCE Dekstop Environment on Archlinux

$
0
0
Xfce is a desktop envorinment for UNIX-like operating systems. It's lightweight, fast and uses low resources on system, while still being visually appealing and user friendly.

Features:
  • Lighter on resources than the other major DEs (KDE, GNOME).
  • Most settings are exposed via a GUI, Xfce does not try to hide stuff from the user.
  • Xfwm has an optional built-in compositor which allows for true transparency and all the benefits of GPU acceleration (minimizes tearing, etc.).
  • It works great with multiple monitors. 
Official Sites:
http://www.xfce.org/

Installation on Archlinux:
$sudo pacman -S xfce4

Additional Packages:
$sudo pacman -S xfce4-goodies lxdm

And another Software that you needed.

After Installation, if you have not used login manager:
$sudo systemctl enable lxdm
Then restart.

You will login into lxdm, then choose xfce-session. At the first time, you will be asked like this. 


Choose "Use Default Config", and this is the default desktop of XFCE:


For configuring XFCE i will write on another post. :)
Enjoy XFCE.

How to Configure XFCE Desktop on Archlinux

$
0
0
After Installing XFCE desktop on Archlinux, Now time to configuring it. On XFCE is very easy because most all configuration done via GUI.


1. Configuring XFCE Panel.
By default there are two panel at top & the bottom. You can modify panel by right click on panel -> Panel -> Panel preferences.

To add/delete panel choose on dropdown menu (panel 1), (+) to add (-) to delete, at least one panel that you can't delete. Every panel have it owns configuration (Display, Appearance, Items). On Display Tab you can change size of panel, lock panel, move panel. To move panel position you must unlock the panel first, then you can move panel using mouse. Appearance tab contains Background panel settings & opacity of panel. 

On Items Appearance, you can edit what listed on panel. (like windows list, system tray, start menu, etc).


2. Configuring Desktop
To configuring desktop simply right click on desktop, then choose Desktop Settings, and here's desktop settings:


You can change background on "Background" Tab, Adjust Brightness/Saturation of your background. And you can set multiple background by choose image list, then check "change the background" time range in minutes.

Menus Tab:

You can set what type of your click on desktop.

Icons Tab:

You can set what icons to available on desktop, File/Launcher icons type is default and recommended if you want to use right click like windows, another option minimize & none will make right click like fluxbox or openbox, no option on there, just application.

3. Enabling Compositing (even if you don't have compiz)
If you want to make window manager transparent, and also other widget like screenlets have transparency, you can enable it on Windows Manager Tweaks, open Settings -> Window Manager Tweaks. Choose Compositor, then enable it (check it)


For conky transparent issues on xfce, i will write on other post.

4. Configure Display Resolution & Settings on XFCE

Open Settings -> Display, Now you can set the resolution easily.


And for Display Settings,Open Settings -> Display Settings.


This for setting up external display (projector or monitor), it usually available on there if you connected it.

5. Configure Notification Position
By default notification is set on top right, to change where notification show, you can set on "Notification", Open Settings -> Notification.


6. Configure Workspace.
You can directly right click on workspace, then choose workspace settings. Or open settings -> Workspace settings, and set the number of workspaces that you need.

If you set 4 workspaces it looks like this:


To change workspace appearance, right click on workspaces, then choose properties.


Set rows to 2, then the appearance will be like this.


Ok that's it about Basic desktop configuration.
Enjoy.

How to get conky transparent with XFCE 4.x on Archlinux

$
0
0
When using LXDE, Fluxbox & Icewm, I can get transparancy for conky by enabling composite using xcompmgr or enabling compiz fusion. But on XFCE4 is different, enabling composite doesn't effect on conky, still get black background.


To enable composite you can see at #3 on this post.

After enabling composite, conky still not get transparent like this below:


Above picture is using "override", following archlinux wiki on here:
https://wiki.archlinux.org/index.php/Conky#Enable_real_transparency_in_KDE4_and_XFCE4

Using normal & desktop,
own_window_type normal
or
own_window_type desktop

I get transparent like this picture:


But there's problem, you can right click on conky area, so if you using wide type of conkyrc, it will be trouble if you usually using right click to open menu. So conkyrc that suitable for xfce with transparancy is small type of conky.

:)

How to change XFCE appearance (theme, icons, wm, etc) on Archlinux

$
0
0
To eyecandy your XFCE desktop, you can get the theme on XFCE-look.org sites, there are lot of theme, icon, etc. Before that, you must create .themes folder on your home desktop first.

$mkdir ~/.themes

1. Installing & Setup Themes on XFCE
To Start set up theme. Find Themes on xfce-look.org, for this example, i will apply this themes:

http://xfce-look.org/content/show.php/Ambiance+Crunchy?content=151180

Download the themes, then extract it:

There are two items, icon & themes,copy any folder inside themes into .themes like this picture. 


And for the icons, copy folder inside icons to /usr/share/icons, but on this themes the icons is useless, just skip it.

Then open Start Menu -> Settings -> Appearance, Now the themes is added. 

Click to apply.

2. Installing Icons on XFCE

Here's the list icon that you can install (available on official repo)

And from AUR:

If you get from other sources, simply copy folder icons into /usr/share/icons,

Then open Settings Appearance, then choose Icons Tab, then set your icons.


3. Change Fonts
open settings -> appearance ->Fonts Tab, then set your prefered fonts.


4. Change Window Manager
Open Settings -> Window Manager -> Style Tab


To install new window manager, same as installing themes, copy folder of wm themes, into .themes folder.

5. Change Mouse Cursor
Open -> Settings -> Mouse & Touchpad -> Theme Tab


For more cursor themes, search on PacmanXG4.

6. Change Windows list / buttons on Panel looks Win 7 Style.
Right click on panel, then panel, -> Panel preferences > Items Tab, choose windows buttons. then edit. Uncheck Show Button Labels


Then your windows button will like this:


Ok that's about appearance on XFCE.
Enjoy.

How to Install Plymouth on Archlinux

$
0
0
Plymouth is a project from Fedora providing a flicker-free graphical boot process. It relies on kernel mode setting (KMS) to set the native resolution of the display as early as possible, then provides an eye-candy splash screen leading all the way up to the login manager.

Sites: http://www.freedesktop.org/wiki/Software/Plymouth

NOTE:
Warning: Plymouth is currently under heavy development and may contain bugs.
To Install it, I using Plymouth Stable from AUR. When write this post i'm using plymouth 0.8.8.8, here's the link:
https://aur.archlinux.org/packages/plymouth/

$sudo wget https://aur.archlinux.org/packages/pl/plymouth/plymouth.tar.gz
$tar -xvzf plymouth.tar.gz
$cd plymouth
$makepkg -s
$sudo pacman -U *.pkg.tar.xz

Plymouth is installed. Now configuring plymouth.

Your System must have KMS enabled, see related post below:

$sudo nano /etc/mkinitcpio.conf
add plymouth like this. on HOOKS.


then save
$sudo mkinitcpio -p linux

And edit the kernel parameters
$sudo nano /etc/default/grub

add "quiet splash" on GRUB_CMDLINE_LINUX_DEFAULT


Then:
$sudo grub-mkconfig -o /boot/grub/grub.cfg

Now set the plymouth themes.

List Plymouth themes:
$plymouth-set-default-theme -l


Set the themes:
$sudo plymouth-set-default-theme -R themenames

For this example i choose solar:
$sudo plymouth-set-default-theme -R solar

Preview themes:
Pres CTRL+ALT+F2
Insert your root password
#plymouthd
#plymouth --show-splash

But don't try to preview it.. I got freeze, only power button work, that get my machines shutdown.. :p

Set gdm, kde, lxdm, lightdm, plymouth service
If you using gdm
#systemctl disable gdm
#systemctl enable gdm-plymouth

That's it now reboot to test it out.
--------------------------
Note:
At this time plymouth seems not running properly. Plymouth cannot quit. Both version stable & git, get same problem. To remove plymouth press ctrl+ alt + f2, when your plymouth not stopping. then login using root user, delete plymouth completely and all settings.

This is my video that using plymouth, but this is 2012 version.


Enjoy.

Using fingerprint for login/su/sudo with Fprint on Archlinux

$
0
0
My Toshiba Portege M600 have a fingerprint feature on it. To enable fingerprint, you can use pam-Fprint software. pam-Fprint  is a simple PAM module which uses libfprint's fingerprint processing and verification functionality for authentication.

Before installing fprint, make sure your hardware is supported, you can see the list on here.

Check lsusb first, on my machines


It's fully supported.

Install Fprint:
$sudo pacman -S fprintd pam libusb imagemagick

Configuration:
$sudo su
#groupadd plugdev
#gpasswd -a yourusername plugdev
#chgrp -R plugdev /dev/bus/usb/

Now set your finger:
For User:
$fprintd-enroll
For Su:
$su
#fprintd-enroll

Roll your finger like this:


Do this 3 times, until all passed:


Then now modify /etc/pam.d/---

For Login gdm/kdm:
Modify: login
$sudo nano /etc/pam.d/login
add this
auth required pam_env.so
auth sufficient pam_fprintd.so
auth sufficient pam_unix.so try_first_pass likeauth nullok
auth required pam_deny.so
For another line comment with #

Like this picture:


And for /su, /sudo same as above.
$sudo nano /etc/pam.d/su
$sudo nano /etc/pam.d/sudo

OK. Now try fingerprint. :D

For sudo & su:


And here's my video, login gdm with fingerprint.


Enjoy. ^_^

How to Install & Configure Mozilla Thunderbird (Email Client) on Archlinux

$
0
0
Mozilla Thunderbird is an email client,news feed client and newsgroup designed around simplicity and fullfeaturedness while avoiding bloat. It supports IMAP, POP,S/MIME,  SMTP, and OpenPGP encryption (with the Enigmail extension). Similar to Firefox, it has a wide variety of extension and addons available for download that add more features.

Thunderbird is available on Archlinux Repository. To install it:
$sudo pacman -S thunderbird

And run Thunderbird, you will be asked for configuring email. 


You can skip it, or configure later. I just close it by clicking [x]. Then here's UI of thunderbird.


Now setup the email. (For example, i will use gmail, yahoo, and cpanel webmail).
1. Gmail
click create a new account., then skip this and using my existing mail..
Insert your Name : Not must be same with your gmail account.
and insert your existing gmail address & password. This will automaticly detected.
You can choose IMAP and POP3.


When Done, your account will be login using your email and password, here's when you done.


Then right click on your email, click get messages. Now all of your email will be listed on thunderbird.


Ok Done For gmail. :D

2. Yahoo
To setup a second account / more click on menu then New, & Get a new email account. or existing mail account.


Insert your yahoo account & password:
I have try POP settings but i always get :
configuration could not be verified thunderbrid yahoo.
So i'm using IMAP. for yahoo client.


Then right click on email, get messages for reloading messages from mail. Here's the result.


3. Cpanel webmail
login to your webmail address of your site, and choose configure mail client.


See box like these:


Then add new email on thunderbird, depend on your webmail cpanel settings. After you add , right click and get messages, to reload all mail from your webmail.


CHat Feature
Another feature of thunderbird is chat, here's default chat client that supported by thunderbird. (Open Menu, New Message, Chat Account.)


Choose then insert your name & password for that account, below is gtalk chat account.


For chat account you can add more account all together, so you do not need to switch windows for each account.

For thunderbird plugins and another feature, i will write in another post.
Enjoy.
^_^

LXDM Configuration on Archlinux (Theme, Autologin, Default DE)

$
0
0
LXDM is lightweight display manager aimed to replace gdm/kdm in LXDE distros. The UI is implemented with GTK+. It is still in early stages of development. LXDM on Archlinux available on official repositories & AUR.

On official repositories:
$sudo pacman -S lxdm

on AUR:
https://aur.archlinux.org/packages/lxdm-git/

On AUR you can use PacmanXG4 for installation.

After you install LXDM, enable services by.

#systemctl enable lxdm

Disable previous dm, before enabling lxdm.

Configuration:

Autologin:
$sudo nano /etc/lxdm/lxdm.conf
Find these line

Then uncomment #autologin=dgod, change dgod with your username
autologin=yourusername

Then save.

Change Default Session.
$sudo nano /etc/lxdm/lxdm.conf
Find these line
Then uncomment #session=/usr/bin/startlxde, change your default DE there.
Example
session=/usr/bin/startkde

alternative way, logout on LXDM, choose the DE on session that you want to make default. Then login. Every time you login you will login into DE that you choose.

Change Themes:

For themes:
$sudo pacman -S archlinux-lxdm-theme

or on AUR links:

https://aur.archlinux.org/packages/archlinux-lxdm-theme-full/

But AUR links looks better, because when i choose Archlinux themes from official repository i got black screen when lxdm is up.

$sudo nano /etc/lxdm/lxdm.conf
Find these line:

Change on Theme, there are 4 themes that you can choose. Here's the snapshot.

Industrial:


ArchDark:


ArchStripes:


Archlinux:


Ok That's it about LXDM
Enjoy.
^_^.
Viewing all 95 articles
Browse latest View live